Trumpet Adapter Redesign - King Cleveland 600 Trumpet

I designed the first iteration of the King Cleveland 600 Trumpet adapter. I took the files from the Bach student trumpet and slightly modified the height and location of the holes for the tubes to extend out, based on a couple photos that were sent to me from a family that is interested in an adapter for their son. I'm going to send a test print to the family to see how it fits on the trumpet, and then make any necessary revisions.


Bach on left, King Cleveland on right. 
UPDATE 11/14

Pictures on the King Cleveland 600 Trumpet


e-NABLE Fellowship - Karuna's Trumpet Holder - Final Design Release

...and that's a wrap! Like with anything I've ever made before, I feel like this is object is one I could keep designing forever, over and over, re-doing all of the components until it's perfect, but sometimes you've just got to say "Hey - this is great! 1st iteration done!" and take a break for a little while. I've had such a great time working on this project. I never could have anticipated the feeling of accomplishment associated with designing for the e-NABLE community. Thank you everyone who has made this fellowship possible!

You can find the final designs on Thingiverse and Youmagine.


e-NABLE Fellowship - Karuna's Trumpet Holder - Scalable .stl

As I am getting prepared to release the files, I've begun to create scalable versions of all the Trumpet Adaptive Device components. It's been kind of challenging for a few of the components because I hadn't thought about this being needed at first... so I haven't modified them in the "right" way, but they will work just fine. I will definitely keep this in mind in the future for any other scalable objects I make.

e-NABLE Fellowship - Karuna's Trumpet Holder - Prep for Karuna's Fitting

I finished up assembling the trumpet adaptive device, just in time for Karuna's fitting. I had about 15 minutes to snap a few quick shots before he arrived. 


It fits in the case!


All of the parts
Palm and gauntlet with dovetail for adapting to trumpet holder. 

The orange piece (main) goes on first...
Followed by the black piece (bottom).


 Ta-da! 

e-NABLE Fellowship - Karuna's Trumpet Holder - Printing Experiments Conclude....


The head print worked! Much faster than the side print and less clean up. 


Side print also worked on the first try - but it was a lot harder to clean up. 


And something else happened today --- that moment you become conscious of your unconscious decisions.... I look just like my office.

e-NABLE Fellowhsip - Karuna's Trumpet Holder - Parts & Parts

Karuna is coming to the DCRL in a couple of days to try on the adaptive device to see if there needs to be further modifications for size. I've started piecing together a couple palm/gauntlet sets, so that he can have a few options for fit. This is the most recent pairing - most up to date with most modifications:
v1 of the palm, v4 of the dovetail and v2 of the gauntlet. I thought this was it - but it wasn't - I made the wrong size holes in the palm piece and it was also super thin and too flexible. 

v2.1 of palm, v4 dovetail, v2 gauntlet - when securing these pieces together I noticed that the gauntlet had to stretch pretty far to get around the thickened wrist part of the palm - so I am going to bend the attachment portion of the gauntlet to accommodate an easier fit. 


v3 of gauntlet - 4 holes for adjusting the angle of dovetail - above is in position 2. I still have to add some cushioning material on the inside, and will cut a few slots for Velcro. 


all of the iterations of all of the parts so far --- still more to go on the palm/hand - it is by far the most complicated component. Looking back, I have made so much progress this past month, and built so much skill in Rhino. I'm really pleased with how far I've come. I am excited to see what I'm able to accomplish in the next month as the fellowship wraps up.  

e-NABLE Fellowship - Karuna's Trumpet Holder - Palm v3

I spent most of today designing version 3 of the palm attachment. Frankie and I had talked about the potential to eliminate the Velcro on the palm attachment by making a cap for the back - like a socket. The challenge now is figuring out the best way to print this object on a Makerbot... (This leads me to think another iteration is necessary - version 4 will have two parts that interlock.) I am test printing two of these hand pieces currently - one printing on it's "head" and another printing on it's "back." ...Wish me luck!  
I created this top part the exact same way as the bottom - curve network & extruded surface & offset surface solids.


I borrowed wrist curve from gauntlet to create profile.


This profile reminds me of Darth Vader - HA! 


printing on it's head - with supports - probably will fail, but why not try? 

e-NABLE Fellowship - Karuna's Trumpet Holder - Palm v2.1 & v2.2

I modified the thickness of the hand/palm piece near the wrist/hinge. I'm trying out two different approaches - one in green and one in blue - the blue one is quite thicker than the green. I am still working with surface offsets to construct any modifications to my designs. I also modified the dovetail slot to have a few more holes to account for a couple more potential angles at which the hand  and arm can be positioned. 


e-NABLE Fellowship - Karuna's Trumpet Holder - Hand/Palm v2

I didn't get as much done today as I would've liked, but I did learn quite a bit about boolean operations. I started drawing hand/palm v2 for Karuna's Trumpet holder, but ran into a few problem right away with curve networks and boolean operations. 


After doing some research into why my design might not have been working, I decided to abandon the form and start over with less complicated curves for the palm... 
  I built this one the exact same way I built the previous, but before boolean-ing I went in and exploded all of the solids and deleted all of the flat surfaces that were "duplicates" on the seam. I'm not sure why this worked and the other way didn't - but it did - so I finally got a rough profile....

I'm currently working on designing the aesthetic surface and the functional parts of the palm... I'm going to keep working on this tomorrow. 

e-NABLE Fellowship - Karuna's Trumpet Holder - Gauntlet v2 vs. Gauntlet v3


v2 ^^^ Doesn't fit on my arm - but you get the idea. The shape here is slightly different than that of v3. I like the way this one feels on my own arm better than the second version - it is more comfortable around the wrist - but that could be because it's just slightly wider. 

v3 ^^^ This version goes around the arm a bit more, has a slightly different profile near the wrist, and a more developed surface pattern. I think the surface and form is more successful on this version than in v2, but there still needs to be some refinement in the functional parts.

Before I do v4, I am going to attempt to make palm/hand v2 using the same process.

e-NABLE Fellowship - Karuna's Trumpet Holder - Gauntlet V3

I am continuing to use the same techniques for building the surface detailing on the gauntlet as I had in v2, but I'm working towards integrating the functional parts with the aesthetic parts more fluidly. By offsetting surfaces that eventually are boolean differenced from the surface, I am able to add filets in areas that otherwise would be complicated to filet on the actual model. I have noticed in the print that these areas transition a lot nicer in v3 than in v2. 


There are still a few things I'd like to adjust in the form of the gauntlet (both functional and aesthetic), but overall I think these parts are relatively successful considering.

I am also very happy with the process I've found for creating varied surface heights - I am looking forward to spending some time outside of the fellowship developing more complex surfaces for wall relief patterns that can be CNC milled.

e-NABLE Fellowship - Midterm Documentation

I can't believe it is already the beginning of the 4th week of my Fellowship with the e-NABLE community. The time has surely flown by.... There has definitely been moments of great success, but of course, those have not come without many revisions in the design process. I have learned so much more about 3D modeling in Rhino than I could have anticipated. Coming into this fellowship, I had only formally taken one class in 3D modeling, which covered the basic techniques for creating form, so I still consider myself to be quite a novice. Most of the objects I have designed up until this point have been relatively simple in construction, but I can see myself progressing rapidly in skill as a result of the challenges I've faced while creating 
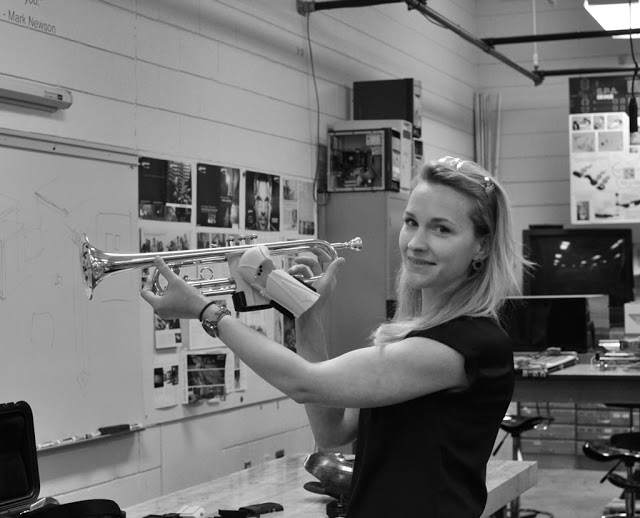
Karuna's Trumpet Holder.

Here are some highlights thus far...

Adaptive Device - Karuna's Trumpet Holder
I've fully designed the attachment mechanism for an adaptive device that will eventually have a palm and gauntlet for a child who plays trumpet. What is exciting about these parts is that the mechanism for attaching a hand and gauntlet is so simple that it could potentially be integrated into many different types of adaptive devices.

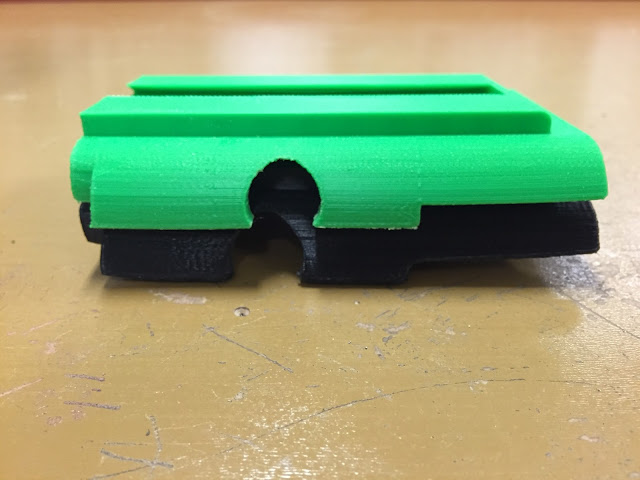
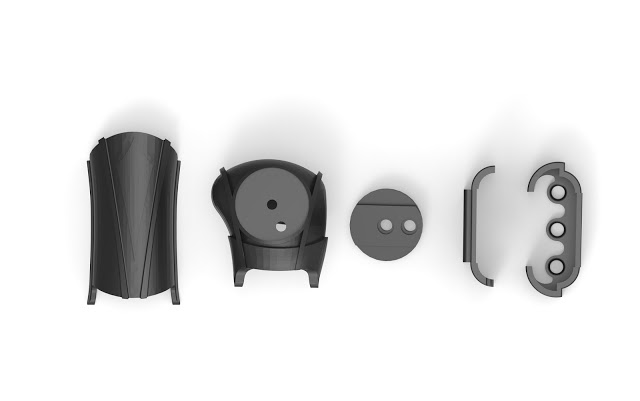
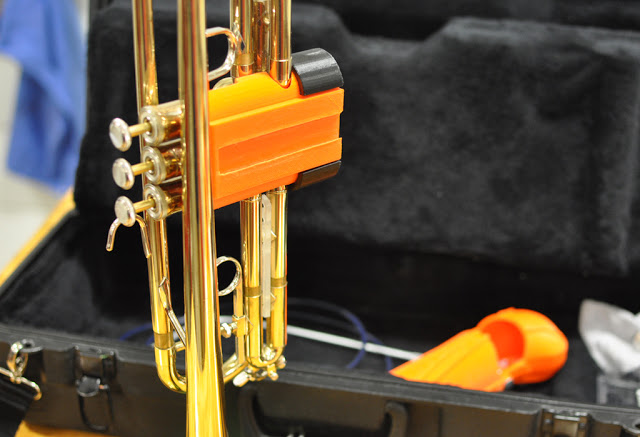
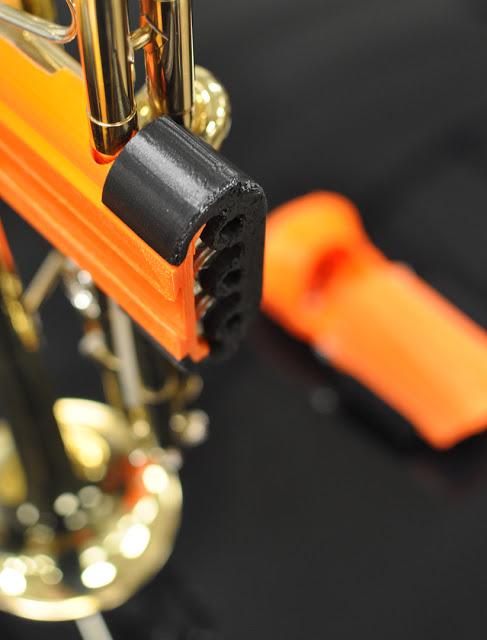
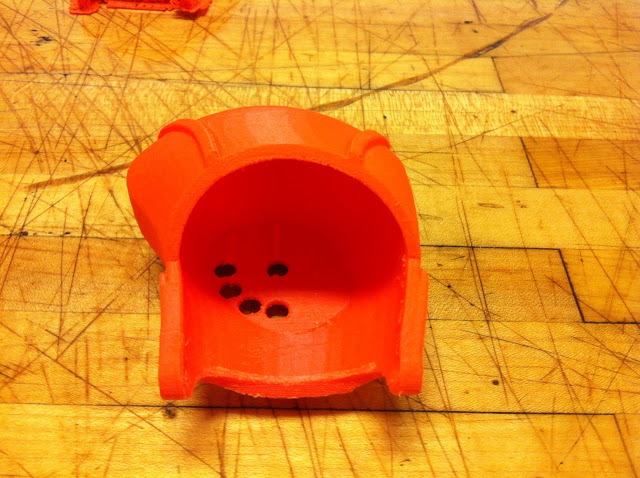
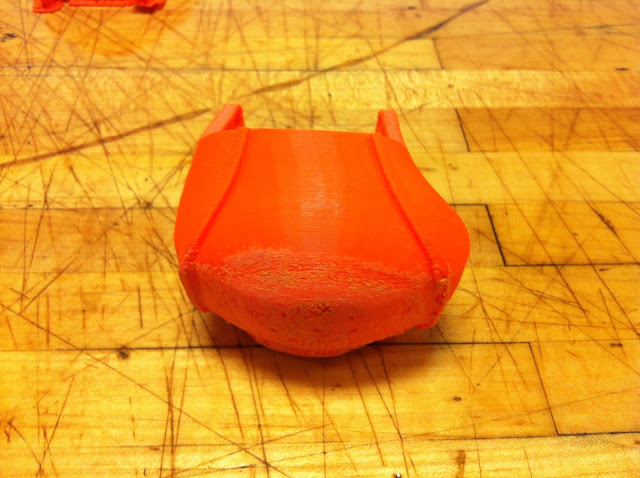
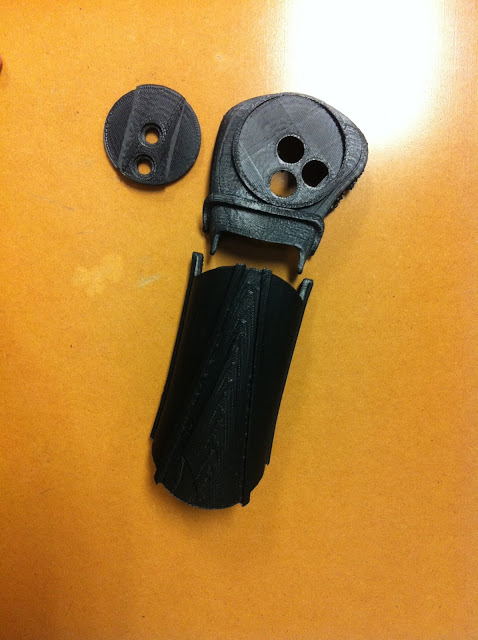
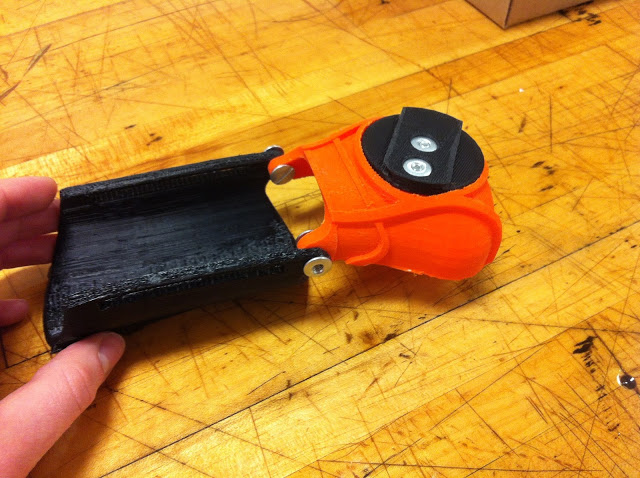
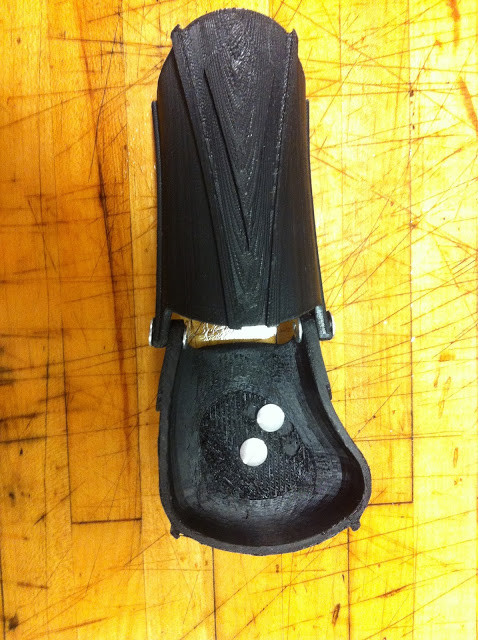
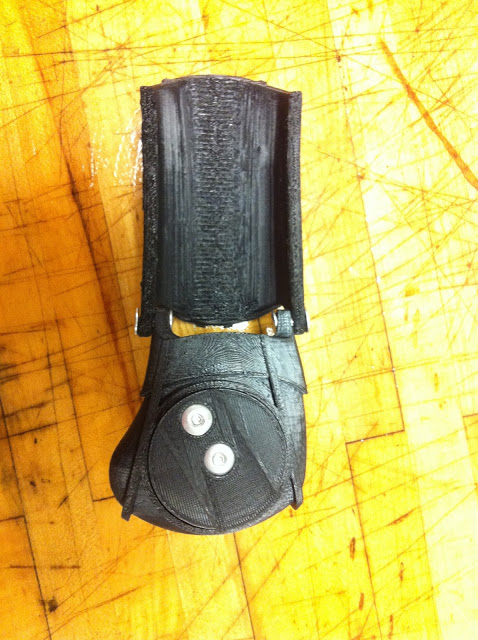
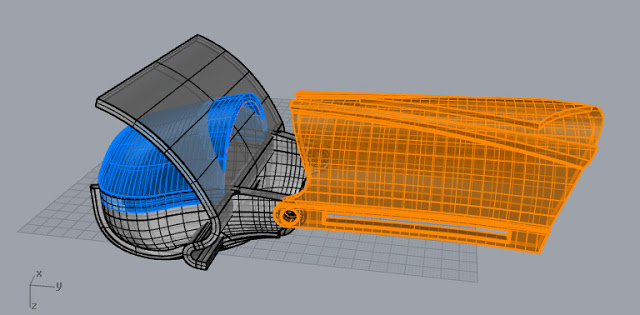
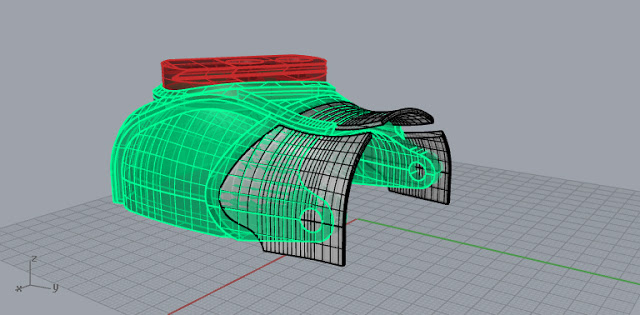
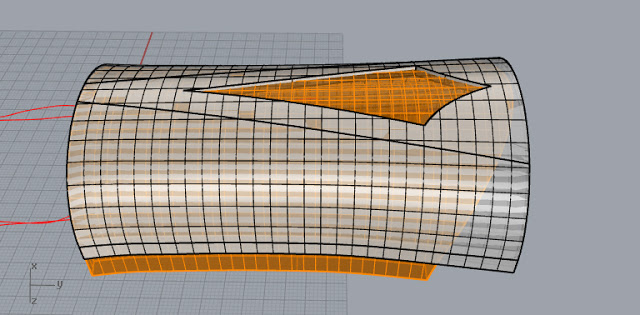
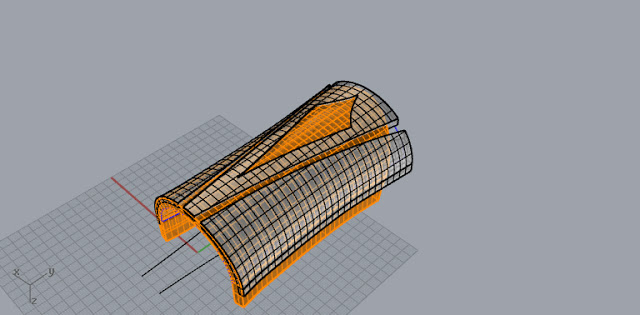
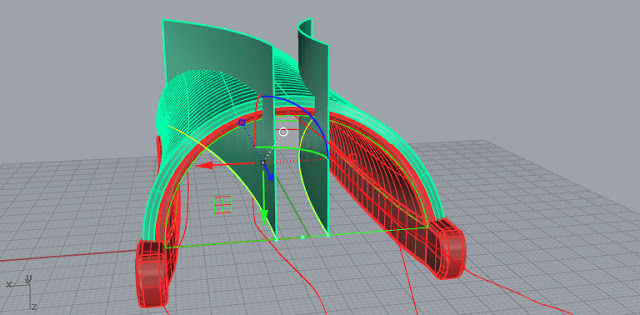
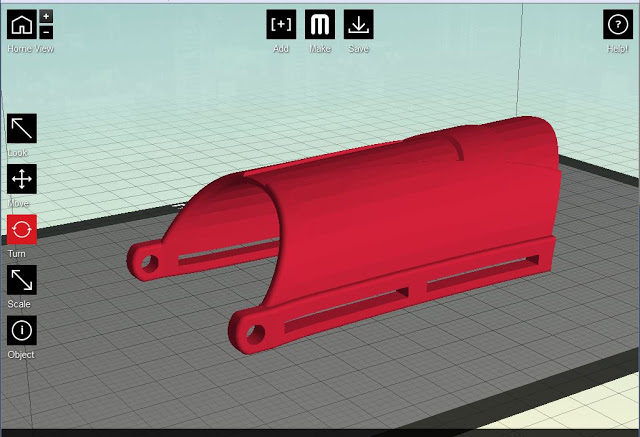
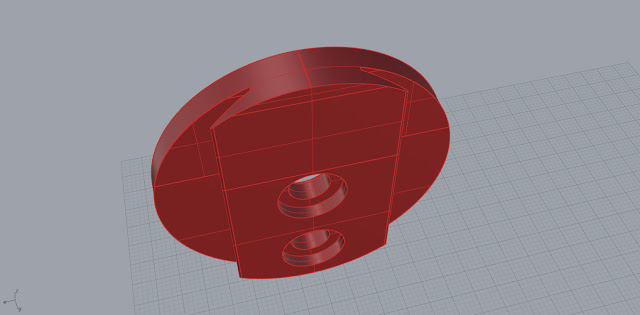
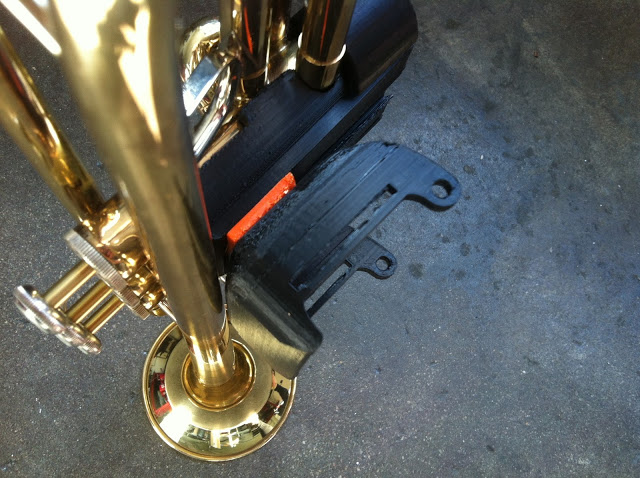
On left: main part - this piece hugs the brass tubes extending out of the valves on the Bach Student Trumpet TR300 and has a dovetail mechanism for attaching the palm and gauntlet on the back-side (seen here). On right: base part that slides over and locks into the main part; secures around the base of valves and allows access to holes in the bottom of valves. 
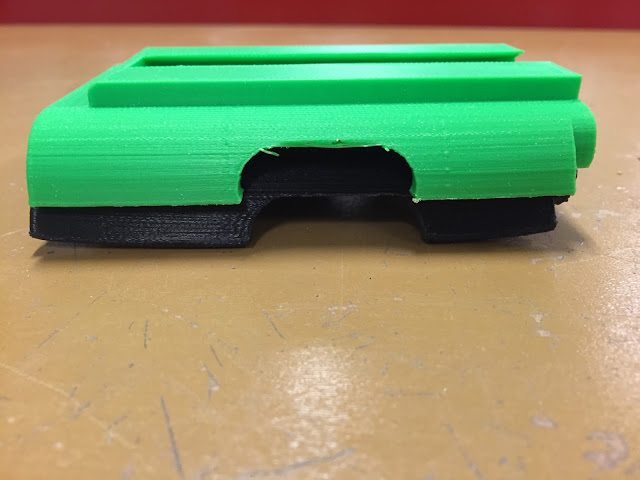
The bottom profiles on each piece of the trumpet attachment are by far the most interesting in terms of design... They were also the most fun to design - getting the tolerances just right was very satisfying. Visually these parts are by far the most interesting and balance nicely between being decorative and having functional importance. If I were to change anything about these parts of the design - I would edit them to contain less material on the sides, so that they don't cost as much to produce, although I really like the simple profiles they afford.  
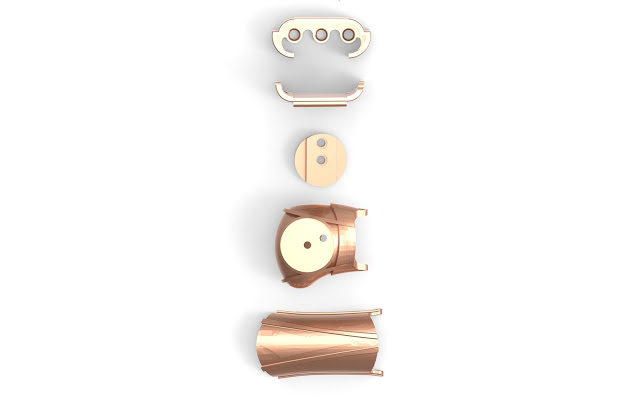
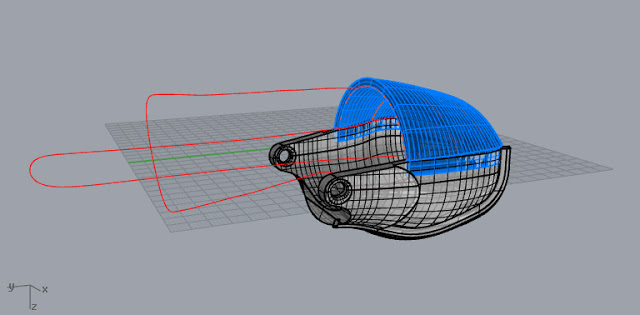
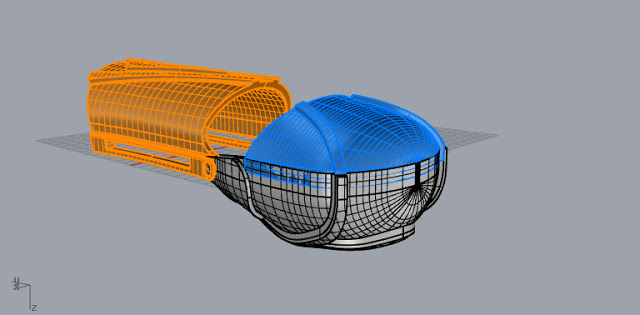
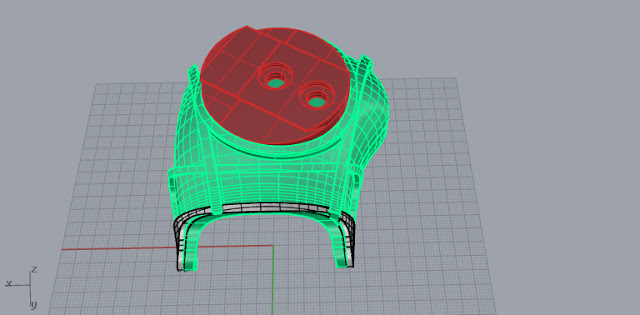
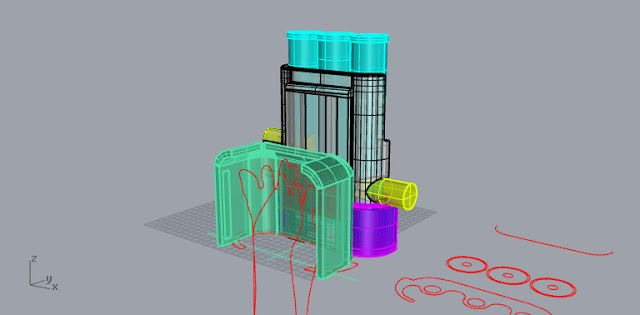
This is a rendered image of the main part and bottom part put together. The palm/hand would slide into the space in the middle of the main part (via dovetail). I went through multiple iterations of the base piece, eventually deciding on this version - where the height of the base's wall reach the same height as the tubes extending out of either side of the valves. I think that this profile is very successful, but I could see the walls getting thinned through the use of relief pattern to save on material and give a more interesting surface. 

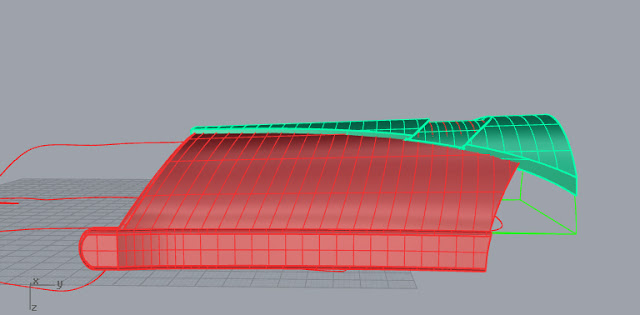
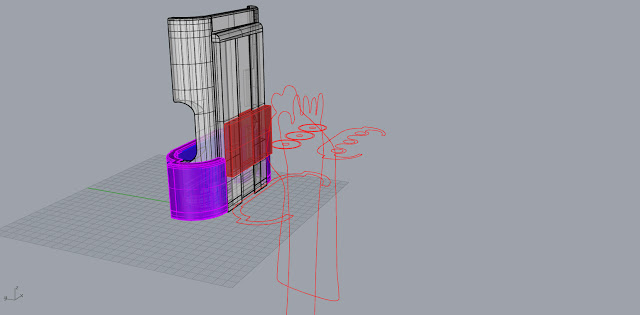
Same setup as above, but opposite side view.  You can see more clearly here the holes for the brass tubes and height similarity I was talking about in the previous caption. 
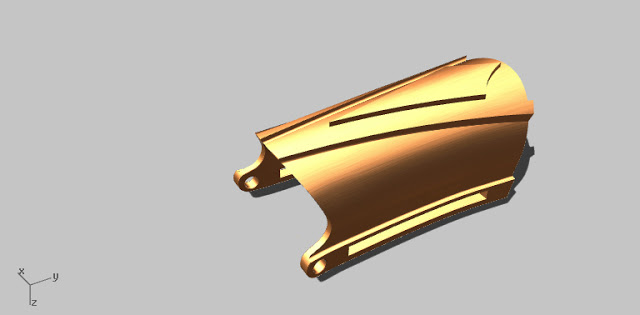
Top shot of the main part and bottom part put together - the valves would be sticking out the top with the palm and gauntlet extending off of the bottom when attached through the dovetail mechanism. 

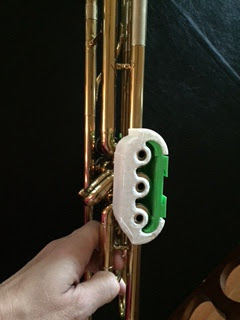
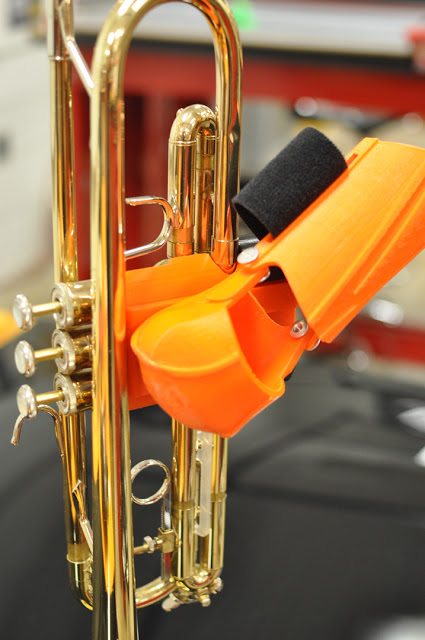
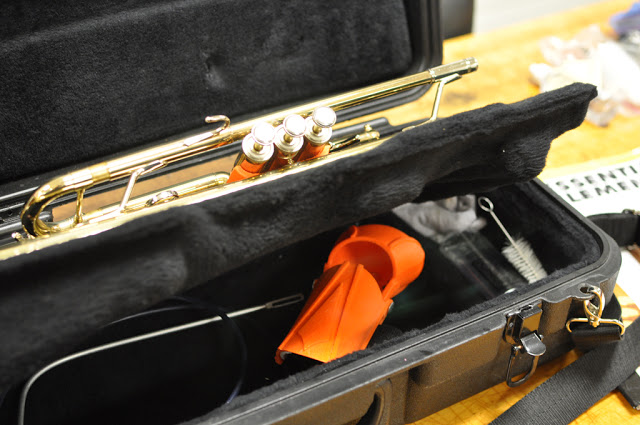
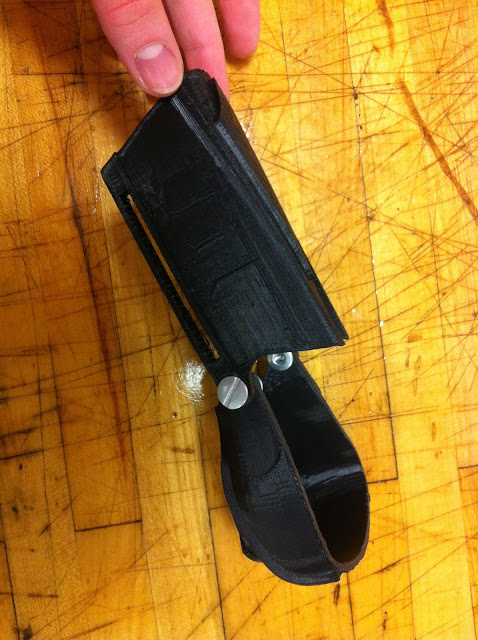
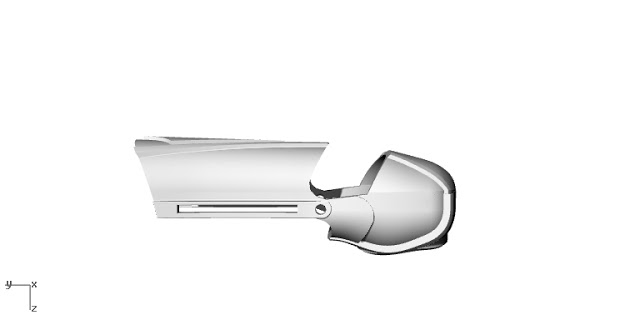
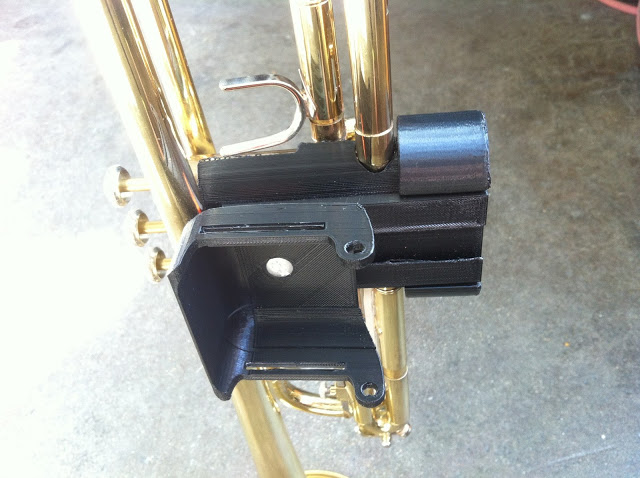
 **** See some images of the trumpet attachment on the actual trumpet here and here.

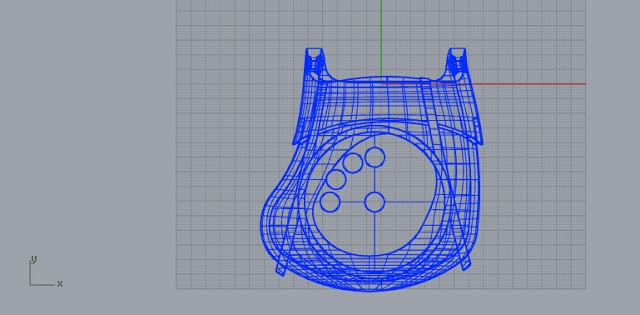
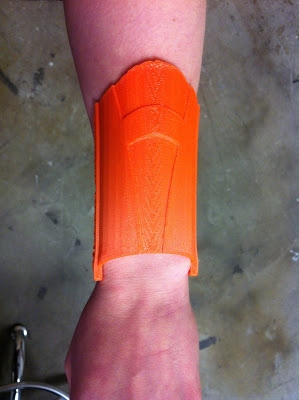
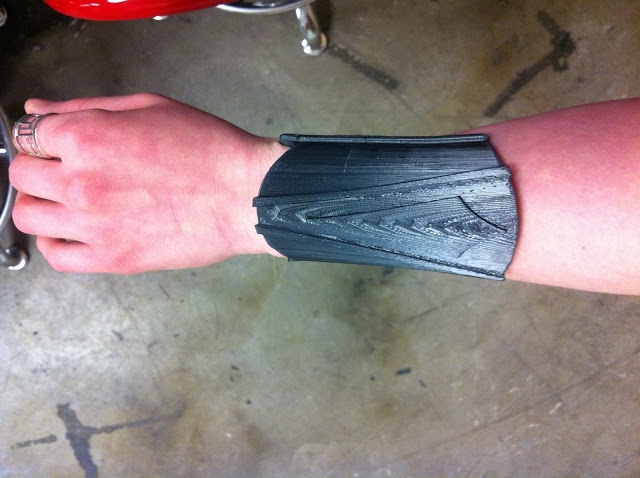
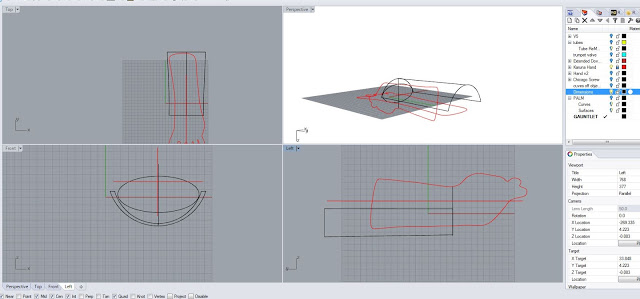
The palm and gauntlet have not been developed quite as far as the rest of the design; they are still in need of lots of refinement. These parts are challenging me in a new way. Where the trumpet adapter was fitting on consistent, geometric shapes that lent themselves to be built with solids - Karuna's palm and gauntlet are exactly the opposite, demanding organic undulating curves that are in need of dynamic curve networks in order to fit his body's contour.
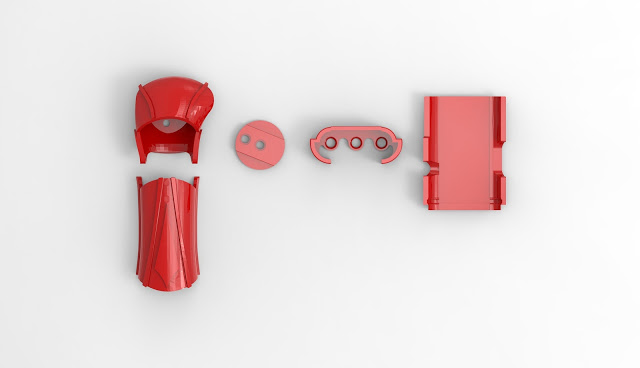
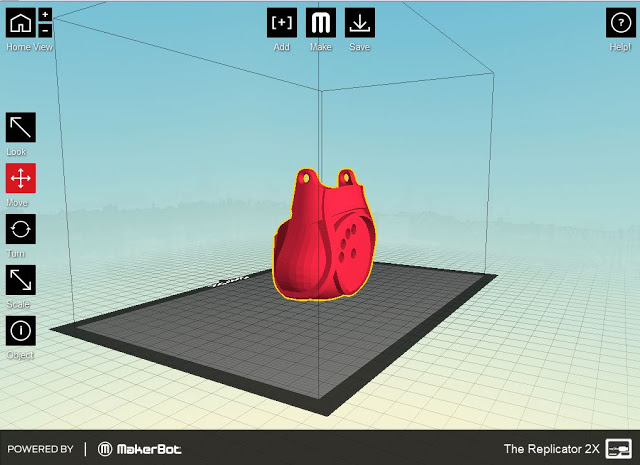
I designed a palm and gauntlet (v1) that attached to a dovetail with a Chicago screw, but decided to re-design them both to be more form fitting... I am in the process of re-designing these parts this week. 
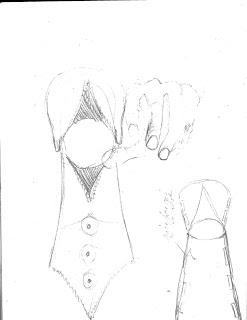
See how far I've gotten.

Looking forward... 

Once the final designs for Karuna's hand and gauntlet have been finished, I will be starting on the second set of milestones that I've set for the Fellowship; material and process experimentation for the creation of hands.

"Weeks 4-9: Research, design and prototype with alternative materials and processes for the creation of hands. Materials of interest include; (1) exos shaping technology, (2) silicone rubber molds and (3) cast-able flexible materials.  Processes and outcomes of interest include; (1) laser cutting for fabrication and flat-pack design, (2) creating standardized molds for alternative production of 3D printed parts and (3) casting flexible materials to increase potential range of motion, aid in comfort and integration on the wearer.  Throughout these tests, design aesthetic and function will be prioritized to facilitate innovation." - Written Plan by Caitlin Driver

Last week, Frankie and Adream had a representative for DJO Global visit the DCRL. They brought with them various products that utilize exos shaping technology. The flexible sheet material used in their products was fun to play around with; it required a brief heating and then was fully mold-able to any desired area on the body. Frankie is investing in some of the material, so I can begin to experiment with it individually and with 3D printed components. I really hope that through the material explorations I can find a new way to design hands effectively without spending the amount of time it currently takes to create hands with 3D printing. I will be posting daily during the week on my blog about my progress.

e-NABLE Fellowship - Karuna's Trumpet Holder - Hand Progress - Part 3

This morning I cleaned up the test hand and dovetail that I printed last night. The piece fits great around the tube at the top of the trumpet. I need to adjust the tolerances around the Chicago screw today, and also add another one for stability. I will test the Velcro slots as soon as I get my hands on some. I didn't take a photo from this angle - but another thing I like is that you can barely see any of the adaptive device from the opposite side. I like the idea of printing these pieces in a clear material eventually to push this even further... To make sure that the instrument and the player's hand and supporting limb remain the most important -with the adaptive device almost undetectable... I wonder if there is a clear alternative material for securing the device onto the hand other than the black Velcro...


e-NABLE Fellowship - Karuna's Trumpet Holder - Hand Progress

I put in a short day today because later Bryan Cera is coming in to help me with a project I started last semester. I did get a little bit of work done on the hand part of the adaptive device... I'm not totally sold on the form the hand is taking, but I'm working through it... I've realized that the way I have gone about building the hand piece is the harder way. Looking at what I have modeled now, I wish I would have started from solids.


e-NABLE Fellowship - Karuna's Trumpet Holder - Hand

I've started working on the hand part of the trumpet holder for Karuna. This hand will be connected to the red dovetail section (that slides into the main body) by two recessed Chicago binding posts. I've downloaded the models for these screws from McMaster-Carr, to use in the design. I've also started to pull curves off of my existing pieces, so that I can start to recycle those design elements into the hand and gauntlet. I've also really quickly traced images of Karuna's hand to make sure that what I'm designing is the right size for his hand. His hand doesn't need to fit perfectly because there will be padding in the hand, but a general reference is nice.